Translate

Showing posts with label Recipes. Show all posts

Monday, January 27, 2014

Gaining A New Perspective On Recipes

I am re-discovering my cookbooks.  Since the change in my diet, the overall view I have on food has evolved.  It's true that going to restaurants can sometimes be a tiresome challenge of trying to make a meal out of the menu offerings.   Yes, there may be more items on my list of can nots than cans.  To some, the thought of never eating bread or any kind of wheat or grain again is impossible.  Add in the removal of legumes, processed food, refined sugar and most dairy and it becomes unfathomable.  It can be a lot to wrap your head around.  Heck, it took me the better part of a year to adjust to a whole new diet.  Now, as I approach the two-year mark, it's just my way of life.  

I do not focus on what I am no longer eating.  Instead, I prefer to savour what's actually on my plate.  Good quality meats, local fruit and vegetables, nuts, seeds and the occasional dessert.  Even some alcohol in small quantaties.  I do not feel as if I am missing out or that my food is in any way lacking.   I have even found that with the subtraction of an option, brings the addition of new ones. A food that you used to hate becomes a staple after you get bored with the basics.  How I ever disliked coconut I will never know.  When it comes to food, there is a method I use to form new opinions.  If I enjoy the taste, but am getting hung up on the texture, I will eat that particular item everyday for at least a week until I become accustomed to it.  If the flavour is the problem, I will look up at least five different ways to prepare or eat the food in hopes of finding a way to enjoy it.  After that anything I still don't like I will try to revisit in the future.  It doesn't work for everything, but it forces me to at least try it from more than one perspective.   

One of the aspects I have been enjoying the most about my time at culinary school is learning the proper techniques of preparing a dish.  Once I know the ingredients, and how they contribute to the end result, I can then go back and alter the recipe to fit my dietary needs while still maintaining the central integrity of it. In my Northern Italian class we had a rack of lamb that was coated in a mixture of panko, fresh herbs, garlic and olive oil before it was seared then baked in an oven.  I replaced the breadcrumbs with almond meal and continued on with the recipe.  I had to keep a closer eye on the lamb since my coating was more easily burned, but it turned out perfect.  Some recipes, like the lamb, only require the smallest tweak to work for me.  Others, half the ingredients must be replaced and the entire methodology changed.  The fun is in the challenge.

In the same light I started to think about some of my favourite cookbooks. I have a few that are specifically paleo, filled with recipes I know I can eat, but the majority are not.  Over the past few weeks I have been going through my collection with an eye for recipes that will work for me.  The process is bringing me back to books I haven't touched in years.  Recipes that were overlooked or forgotten are centre stage again.  I have to say looking through cookbooks is my happy place.  It relaxes me more than yoga ever will.  As I read through recipes I can practically taste each dish.  Aromas flow off the pages, often leaving me salivating.  Each picture or ingredient list sparks my creativity and urges me to get into the kitchen.  Knowledge can be found in every recipe, even the ones you are not fond of. 

I am about halfway through my cookbook collection. The sticky notes are dwindling, the excel chart of recipe locations is growing and more food awaits me on the horizon. It's time to eat.


G.

Sunday, November 10, 2013

G Eats: Almond Crusted Pork Chops

My Mum has always made the best breaded pork chops.  I don't miss bread, but I miss those. At least I did until I realized a paleo version was just waiting to be made.  Perhaps I can go through her recipes and re-vamp all my favourites.  Until then at least I have these.


Almond Crusted Pork Chops
4-6 boneless pork chops
1 cup almond milk
1-2 cups almond meal
1 tsp garlic powder
1 tsp onion powder
Salt & pepper; to taste

Preheat oven to 350.  Line a baking sheet with parchment paper.

In a wide, shallow bowl mix the almond meal, garlic powder, onion powder, salt & pepper. Set aside.  Place the almond milk in a similar bowl and set aside as well.

Using a meat mallet, pound the pork until it is a thin even thickness.  Working with one piece at a time, dip the pork into the almond milk and let it sit for a minute.  

Lift pork out of milk and shake lightly, then press it into the almond meal mixture. Turn the pork over and press the other side into the mixture as well, ensuring it is firmly packed on.  Shake off excess, then place on parchment lined tray.  Repeat with remaining pork.

Bake for 30 minutes, flipping halfway through, until pork is cooked through and breading is golden.*

Serve with mashed cauliflower and steamed veggies for dinner. Or with sauteed cabbage and fried eggs for breakfast.

*Please note that almond meal burns easily so keep a close eye on the pork.  If your oven runs hot or you think the breading is starting to burn turn the temp down to 325


G.

Saturday, November 2, 2013

G Eats: Wing Tips w BBQ Sauce

I have a favourite snack that some might consider weird.  I love to munch on crispy, crunchy, delectable chicken wing tips.  Baked until they are golden brown and easy to bite through, they pair well with a smokey bbq sauce for dipping.  These often discarded morsels may seem an odd choice, but I would pick them over a handful of chips any day of the week.


Wing tips are cheap.  You can find packages of them on their own at the grocery store.  You could also buy chicken wings and instead of throwing the part away, start a wing tip collection in the freezer for future snacking.  I've always been so content to snag the tips off my roast chickens that I had to give a full snack plate of them a shot.  This dish is really simple.  Very few ingredients but lots to love about it.  


Chicken Wing Tips
1 package of wing tips
Salt & pepper to taste
1 cup of your favourite bbq sauce

Preheat oven to 375.

Season your wing tips and lay them out in one layer on a baking sheet.  Place in oven and bake 30-40 minutes, flipping once, until golden brown and crispy.

Serve with bbq sauce for dipping.  

It may seem crazy but don't write them off until you try them. The flavour possibilities are endless.  Toss a dry rub on them before baking, experiment with different dipping sauces, whatever you like.

Enjoy!


G.   

Sunday, July 28, 2013

G Eats: Honey Ginger Chicken Stir Fry

Stir fry has to be the one of the easiest ways to use up a lot of veggies and stretch out a smaller amount of meat.  It comes together quickly for a delicious meal full of good for you stuff. This recipe came together as one of those toss-what-you-got-into-a-pan-and-make-it-delicious kinda meals.  Feel free to use whatever vegetables you have on hand for this one.


Honey Ginger Chicken Stir Fry

4-6 Boneless skinless chicken thighs, cut into 1 inch pieces
Marinade:
3 TBSP Coconut Aminos
1/2 tsp each Onion Powder, Garlic Powder & Ground Ginger

Place chicken in non reactive bowl. Combine marinade ingredients and pour over chicken.  Toss well to coat.  Set aside in fridge for at least 1 hour.

1/2-1 Cup Tapioca Starch {enough for just a light coating on the chicken} seasoned to taste with salt & pepper
Coconut Oil for the pan
Assorted Mixed Vegetable {onions, carrots, celery, mushroom, broccoli or whatever you have on hand}
2 Cloves garlic; minced
Sauce:
1/4 Cup Coconut Aminos
Ground Ginger
Chilli Flakes
Lime Juice 
Honey
{add the seasonings to your own taste, depending on how hot or sweet you like your sauce}
Arrowroot Powder {for thickening if needed} 

Heat enough oil in a frying pan or wok for a shallow pan fry.  Dredge marinated chicken pieces in the tapioca starch, shaking off any excess.  Pan fry in batches until cooked, flipping part way through.  Roughly 5-7 minutes.  Set aside on paper towel lined plate.

Remove extra oil and toss in your mixed vegetables {except for the broccoli which can be added later so it won't over cook}.  Fry until they begin to get tender {you can add a bit of water to steam them slightly if you want to speed up the cooking process} when they are at the halfway done mark, stir in the broccoli and garlic.  Cook for a couple more minutes, then pour in the sauce.  Continue cooking until the vegetables are at their desired doneness and the sauce has thickened.  Add the chicken back to the pan and mix.

Serve on a bed of riced cauliflower.

Enjoy!


G.

Wednesday, May 15, 2013

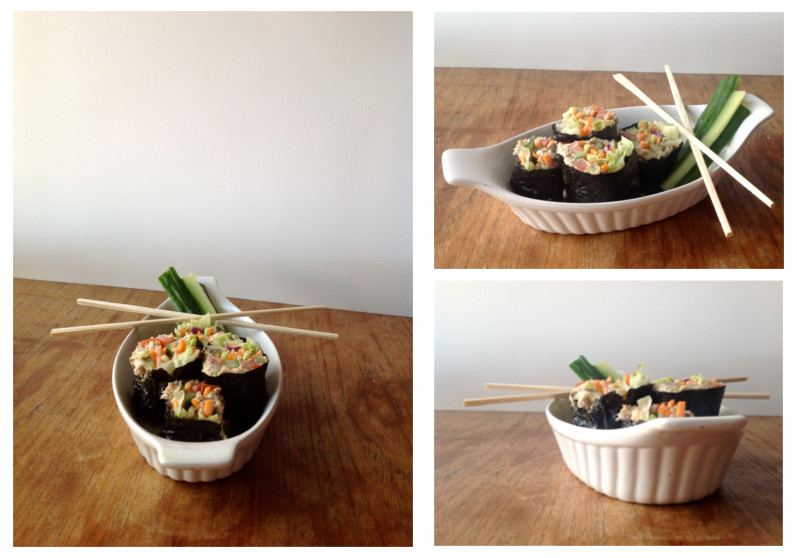
G Eats: Tuna Salad Rolls

We've had some confused weather around here lately.  Last week everyone was out in full force donning summer clothing, only to be rudely interrupted by hail on the weekend.  We were left to frantically pull out our freshly packed away cold weather wear.  My beach volleyball team toughed it out in icy sands, then I awoke the next morning to a beautiful warm sunny day.  Although Mother Nature can't quite make up her mind there is one constant here in my humble abode: even the slightest rise in temperature outside turns my apartment into a stuffy hot box.

Naturally when it gets hot inside I try to keep the stove/oven use to a minimum. We eat a lot of snack plates around here in the summer months.  In a bid to keep our food interesting, even if I'm not cooking it, I've started experimenting with using sheets of nori to make cold rolls.


The other night I was left on my own for dinner and feeling rather lazy.  I decided to whip up a batch of paleo mayo and have some tuna salad.  *A note on mayo {paleo or otherwise}: if you are not making your own mayo, you should be! Fresh homemade mayo tastes sooooo much better than any of the store bought crap.  Also with the use of a regular or immersion blender it's easy to toss together a batch.  I strongly believe that my salads requiring a mayo dressing greatly benefit from a homemade approach.* 

Now, let me say, there's nothing fancy about my standard tuna salad.  It's just canned tuna, mayo, celery, onions, salt, pepper, dill and paprika.  Sometimes I add a little more heat to it if I'm in the mood for spice, but I like the simplicity of it.  Initially I had planned on just eating it with a fork right out of the bowl leaning against the counter like the classy girl I am. Then I figured I'd toss it on some lettuce and perhaps sit down. But the nori beckoned to me from the cupboard and it whispered tuna salad rolls. 


Tuna Salad Rolls

For the tuna salad:
1 Can flaked tuna in water; drained
2-3 Tbsp Mayo {hopefully homemade}
1 Celery stalk; diced
1-2 Green onions; diced {use just the white part here and reserve the green tops for the rolls}
1-2 tsp fresh or dried dill {or to taste}
1-2 pinches of paprika
Salt & Pepper to taste

Mix all ingredients in a bowl until evenly combined.  Adjust seasonings to taste. Set aside in fridge.

For the rolls:
1-2 Sheets of nori {the number of sheets you use will depend on how thick you want your rolls}
1/3 Cucumber; seeded and cut into matchsticks
1-2 Green onion tops; sliced lengthwise
1/2 Carrot; cut into matchsticks {or you can use a carrot slaw mix like I did to save time}
1/2-1 Cup shredded lettuce
Tuna Salad

Lay out a sheet of nori on a cutting board.  Sprinkle it with a little bit of water to make it pliant.  I just wet my finger tips and flicked the water onto the sheet so it was slightly damp but not so wet that it would tear once I started to roll.

Start by laying down some of the tuna salad.  I leave about an inch and a half of the nori sheet closest to me empty so I have room to start to roll from.  Layer your vegetable matchsticks on top followed by the lettuce.  Now you should have a mound of filling ready to be rolled up.  The amount of filling you put in will not only determine how large your rolls will be but it will affect how easy it is to roll the nori. I'm not an expert at rolling nori so I just went with the good old trial and error method for this.

Grab the end closest to you and pull it up over your fillings.  You want to tuck it over as your begin to roll and really focus on keeping it tight so your salad stays nicely secure in the nori package.  Roll all the way up to the end and make sure it adheres so your roll stays together. Repeat with remaining ingredients. 

Once all your rolls are made you can then cut them into your desired size.  You can keep them longer like the size of a spring roll or cut them more bite sized like sushi.  I suggest you use a very sharp knife that you clean off after every cut or two or it'll become harder to cut through your rolls.

Plate and enjoy!


Note: Feel free to play around with the tuna salad flavourings.  This is just a basic recipe so you can add whatever spices or ingredients you want to make it more exciting. If you're not a mayo person use a mashed up avocado instead.  Hate tuna? Chicken salad would work as well. You could also just lay down the mashed up avocado and put the remaining ingredients on top for a vegetarian friendly roll.  The sky's the limit!


G.