Translate

Showing posts with label Food. Show all posts

Monday, January 27, 2014

Gaining A New Perspective On Recipes

I am re-discovering my cookbooks.  Since the change in my diet, the overall view I have on food has evolved.  It's true that going to restaurants can sometimes be a tiresome challenge of trying to make a meal out of the menu offerings.   Yes, there may be more items on my list of can nots than cans.  To some, the thought of never eating bread or any kind of wheat or grain again is impossible.  Add in the removal of legumes, processed food, refined sugar and most dairy and it becomes unfathomable.  It can be a lot to wrap your head around.  Heck, it took me the better part of a year to adjust to a whole new diet.  Now, as I approach the two-year mark, it's just my way of life.  

I do not focus on what I am no longer eating.  Instead, I prefer to savour what's actually on my plate.  Good quality meats, local fruit and vegetables, nuts, seeds and the occasional dessert.  Even some alcohol in small quantaties.  I do not feel as if I am missing out or that my food is in any way lacking.   I have even found that with the subtraction of an option, brings the addition of new ones. A food that you used to hate becomes a staple after you get bored with the basics.  How I ever disliked coconut I will never know.  When it comes to food, there is a method I use to form new opinions.  If I enjoy the taste, but am getting hung up on the texture, I will eat that particular item everyday for at least a week until I become accustomed to it.  If the flavour is the problem, I will look up at least five different ways to prepare or eat the food in hopes of finding a way to enjoy it.  After that anything I still don't like I will try to revisit in the future.  It doesn't work for everything, but it forces me to at least try it from more than one perspective.   

One of the aspects I have been enjoying the most about my time at culinary school is learning the proper techniques of preparing a dish.  Once I know the ingredients, and how they contribute to the end result, I can then go back and alter the recipe to fit my dietary needs while still maintaining the central integrity of it. In my Northern Italian class we had a rack of lamb that was coated in a mixture of panko, fresh herbs, garlic and olive oil before it was seared then baked in an oven.  I replaced the breadcrumbs with almond meal and continued on with the recipe.  I had to keep a closer eye on the lamb since my coating was more easily burned, but it turned out perfect.  Some recipes, like the lamb, only require the smallest tweak to work for me.  Others, half the ingredients must be replaced and the entire methodology changed.  The fun is in the challenge.

In the same light I started to think about some of my favourite cookbooks. I have a few that are specifically paleo, filled with recipes I know I can eat, but the majority are not.  Over the past few weeks I have been going through my collection with an eye for recipes that will work for me.  The process is bringing me back to books I haven't touched in years.  Recipes that were overlooked or forgotten are centre stage again.  I have to say looking through cookbooks is my happy place.  It relaxes me more than yoga ever will.  As I read through recipes I can practically taste each dish.  Aromas flow off the pages, often leaving me salivating.  Each picture or ingredient list sparks my creativity and urges me to get into the kitchen.  Knowledge can be found in every recipe, even the ones you are not fond of. 

I am about halfway through my cookbook collection. The sticky notes are dwindling, the excel chart of recipe locations is growing and more food awaits me on the horizon. It's time to eat.


G.

Thursday, January 9, 2014

G Eats: Instagram Food Roundup

I am one of those people. An Insta-grammer whose primary photo subject is food. If you follow my feed be prepared to always know what I'm cooking or eating.  I love being able to share things so easily.  The downside is I've gotten into the habit of snapping a quick 'pic', posting it, then moving on.  I've come to realize that some of the food I'm sharing on Instagram would be better off on here along side a recipe.  Enter my food roundup.  Every now and then I will search through my Instagram for a past food picture that I believe deserves a bit more of a spotlight and I'll bring it over here for it's day in the sun.

This round I'd like to introduce you to: Breakfast "Pizza"


{Primal Antipasto Egg Pizza}
Eggs are a breakfast staple for me.  Toss 'em with some veggies, add some meat and you've got yourself a filling meal to kickstart your day.   I will eat eggs any which way and changing them up keeps me from getting bored.  A girl can only eat so many omelettes. Besides, half the fun of food is finding creative ways to present it.  

This recipe came about when I was craving pizza for breakfast.  It's not quite the same as pulling a cold slice out of the fridge and calling it a meal, but it's pretty darn good.  All the pizza flavours, minus the grease and guilt, plus my daily dose of eggs.

Breakfast Pizza
Coconut oil, for the pan
2 Eggs, well beaten
2-3 TBSP pizza sauce or tomato paste
Toppings of choice: veggies, meat, cheese, spices etc.
{In the case of this pizza I had prosciutto, roasted red peppers, sauteed mushrooms, chives and goat cheese.  It is best to have your veggies and meat pre-cooked since this doesn't get put in an oven}

Heat a crepe pan over medium heat.  Add a spoonful of coconut oil.  

Once hot, pour your beaten eggs onto the pan and swirl around to create an even surface, just like you would if you were making crepes.  Turn the heat down to med-low to allow the eggs to cook without burning.  Let it go for 2-3 minutes until eggs are set enough to flip.  

With a spatula, carefully flip the eggs over to finish the cooking process.  While this side is cooking begin building your pizza. 

Spread the sauce onto the eggs then layer your remaining ingredients just like you would a regular pizza.  At this point I will sometimes place a lid on it to heat the toppings a bit and let the cheese melt, but this step is optional.  Once you have all your toppings on the eggs should be done.

Slide onto a plate and enjoy!


G.

Tuesday, December 3, 2013

Let G Make Cake!

Birthday cakes! I make a lot of them for my friends and family.  It's always nice to present someone with a cake just for them on their special day.  I thought I would share with you some of the ones I've made over the past few months.

Cake number one is a Harry Potter themed cake for a friends 30th birthday.  Hogwarts was a marble cake batter baked in a Nordicware castle bundt pan.  Each turret had the individual house crests in them and the centre the Hogwarts crest and motto.  It sat on a chocolate slab cake that was decorated with trees and icing to represent the forrest and water.

The second cake is a candy cake.  A request from my neighbour as a surprise for her boyfriend.  This was two layers of rich chocolate cake with chocolate frosting.  Ladyfingers pressed around the sides and tied with a ribbon.  White chocolate wafers separated by smarties along the perimeter and mini m&m's for the writing.    

For my Dads birthday.  A simple layer cake with coconut whipped cream and strawberry puree.   A few chocolate shavings for garnish.


Lastly for my friends annual birthday dinner gathering a 10" Ricotta Cheesecake.  Almond meal crust and a light lemon flavour.  Served with chocolate and strawberry sauces on the side.


Looking forward to all of the cakes, birthday and otherwise, I will make in the new year.


G.


Sunday, November 10, 2013

G Eats: Almond Crusted Pork Chops

My Mum has always made the best breaded pork chops.  I don't miss bread, but I miss those. At least I did until I realized a paleo version was just waiting to be made.  Perhaps I can go through her recipes and re-vamp all my favourites.  Until then at least I have these.


Almond Crusted Pork Chops
4-6 boneless pork chops
1 cup almond milk
1-2 cups almond meal
1 tsp garlic powder
1 tsp onion powder
Salt & pepper; to taste

Preheat oven to 350.  Line a baking sheet with parchment paper.

In a wide, shallow bowl mix the almond meal, garlic powder, onion powder, salt & pepper. Set aside.  Place the almond milk in a similar bowl and set aside as well.

Using a meat mallet, pound the pork until it is a thin even thickness.  Working with one piece at a time, dip the pork into the almond milk and let it sit for a minute.  

Lift pork out of milk and shake lightly, then press it into the almond meal mixture. Turn the pork over and press the other side into the mixture as well, ensuring it is firmly packed on.  Shake off excess, then place on parchment lined tray.  Repeat with remaining pork.

Bake for 30 minutes, flipping halfway through, until pork is cooked through and breading is golden.*

Serve with mashed cauliflower and steamed veggies for dinner. Or with sauteed cabbage and fried eggs for breakfast.

*Please note that almond meal burns easily so keep a close eye on the pork.  If your oven runs hot or you think the breading is starting to burn turn the temp down to 325


G.

Saturday, November 2, 2013

G Eats: Wing Tips w BBQ Sauce

I have a favourite snack that some might consider weird.  I love to munch on crispy, crunchy, delectable chicken wing tips.  Baked until they are golden brown and easy to bite through, they pair well with a smokey bbq sauce for dipping.  These often discarded morsels may seem an odd choice, but I would pick them over a handful of chips any day of the week.


Wing tips are cheap.  You can find packages of them on their own at the grocery store.  You could also buy chicken wings and instead of throwing the part away, start a wing tip collection in the freezer for future snacking.  I've always been so content to snag the tips off my roast chickens that I had to give a full snack plate of them a shot.  This dish is really simple.  Very few ingredients but lots to love about it.  


Chicken Wing Tips
1 package of wing tips
Salt & pepper to taste
1 cup of your favourite bbq sauce

Preheat oven to 375.

Season your wing tips and lay them out in one layer on a baking sheet.  Place in oven and bake 30-40 minutes, flipping once, until golden brown and crispy.

Serve with bbq sauce for dipping.  

It may seem crazy but don't write them off until you try them. The flavour possibilities are endless.  Toss a dry rub on them before baking, experiment with different dipping sauces, whatever you like.

Enjoy!


G.   

Friday, September 20, 2013

Good Food Box

Today I received my very first good food box.  I am proud to be supporting my local farmers.  The program, run by Foodshare Toronto, allows me to buy fresh, good quality produce, at a fraction of the cost. As someone who is watching both her wallet and what she eats, this couldn't be a more perfect fit for me.  

As I arrived at the pick up site,  I felt as if it was Christmas morning.  There sat a little green box, contents unknown, with my name on the lid.  It was just waiting to be opened. Each piece of produce pulled out of the box brought a smile to my face.  I wish everyone could be that happy when buying their fruit and veggies.  


My first box, priced at $24.00, was a small organic good food box. It included:

4 Apples
1 Avocado
1 Bunch Bananas {Fair Trade}
1 Large Cabbage
1 Bunch Kale
1 Bunch Red Leaf Lettuce
1 Red Onion
1 Green Pepper
1 lb Potatoes
.5 Basket Field Tomatoes
2 Heirloom Tomatoes

All of these items are organic and only two (the avocado & bananas) are not local produce. 

As of right now I am excited to eat all of this food and to try out the other boxes that are offered.  I'm sure next weeks present will be just as wonderful!


G.

Sunday, July 28, 2013

G Eats: Honey Ginger Chicken Stir Fry

Stir fry has to be the one of the easiest ways to use up a lot of veggies and stretch out a smaller amount of meat.  It comes together quickly for a delicious meal full of good for you stuff. This recipe came together as one of those toss-what-you-got-into-a-pan-and-make-it-delicious kinda meals.  Feel free to use whatever vegetables you have on hand for this one.


Honey Ginger Chicken Stir Fry

4-6 Boneless skinless chicken thighs, cut into 1 inch pieces
Marinade:
3 TBSP Coconut Aminos
1/2 tsp each Onion Powder, Garlic Powder & Ground Ginger

Place chicken in non reactive bowl. Combine marinade ingredients and pour over chicken.  Toss well to coat.  Set aside in fridge for at least 1 hour.

1/2-1 Cup Tapioca Starch {enough for just a light coating on the chicken} seasoned to taste with salt & pepper
Coconut Oil for the pan
Assorted Mixed Vegetable {onions, carrots, celery, mushroom, broccoli or whatever you have on hand}
2 Cloves garlic; minced
Sauce:
1/4 Cup Coconut Aminos
Ground Ginger
Chilli Flakes
Lime Juice 
Honey
{add the seasonings to your own taste, depending on how hot or sweet you like your sauce}
Arrowroot Powder {for thickening if needed} 

Heat enough oil in a frying pan or wok for a shallow pan fry.  Dredge marinated chicken pieces in the tapioca starch, shaking off any excess.  Pan fry in batches until cooked, flipping part way through.  Roughly 5-7 minutes.  Set aside on paper towel lined plate.

Remove extra oil and toss in your mixed vegetables {except for the broccoli which can be added later so it won't over cook}.  Fry until they begin to get tender {you can add a bit of water to steam them slightly if you want to speed up the cooking process} when they are at the halfway done mark, stir in the broccoli and garlic.  Cook for a couple more minutes, then pour in the sauce.  Continue cooking until the vegetables are at their desired doneness and the sauce has thickened.  Add the chicken back to the pan and mix.

Serve on a bed of riced cauliflower.

Enjoy!


G.

Wednesday, May 15, 2013

G Eats: Tuna Salad Rolls

We've had some confused weather around here lately.  Last week everyone was out in full force donning summer clothing, only to be rudely interrupted by hail on the weekend.  We were left to frantically pull out our freshly packed away cold weather wear.  My beach volleyball team toughed it out in icy sands, then I awoke the next morning to a beautiful warm sunny day.  Although Mother Nature can't quite make up her mind there is one constant here in my humble abode: even the slightest rise in temperature outside turns my apartment into a stuffy hot box.

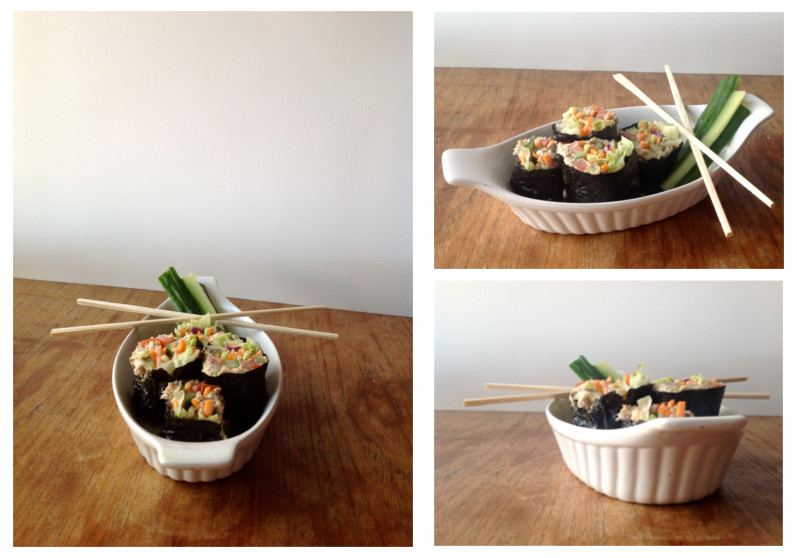
Naturally when it gets hot inside I try to keep the stove/oven use to a minimum. We eat a lot of snack plates around here in the summer months.  In a bid to keep our food interesting, even if I'm not cooking it, I've started experimenting with using sheets of nori to make cold rolls.


The other night I was left on my own for dinner and feeling rather lazy.  I decided to whip up a batch of paleo mayo and have some tuna salad.  *A note on mayo {paleo or otherwise}: if you are not making your own mayo, you should be! Fresh homemade mayo tastes sooooo much better than any of the store bought crap.  Also with the use of a regular or immersion blender it's easy to toss together a batch.  I strongly believe that my salads requiring a mayo dressing greatly benefit from a homemade approach.* 

Now, let me say, there's nothing fancy about my standard tuna salad.  It's just canned tuna, mayo, celery, onions, salt, pepper, dill and paprika.  Sometimes I add a little more heat to it if I'm in the mood for spice, but I like the simplicity of it.  Initially I had planned on just eating it with a fork right out of the bowl leaning against the counter like the classy girl I am. Then I figured I'd toss it on some lettuce and perhaps sit down. But the nori beckoned to me from the cupboard and it whispered tuna salad rolls. 


Tuna Salad Rolls

For the tuna salad:
1 Can flaked tuna in water; drained
2-3 Tbsp Mayo {hopefully homemade}
1 Celery stalk; diced
1-2 Green onions; diced {use just the white part here and reserve the green tops for the rolls}
1-2 tsp fresh or dried dill {or to taste}
1-2 pinches of paprika
Salt & Pepper to taste

Mix all ingredients in a bowl until evenly combined.  Adjust seasonings to taste. Set aside in fridge.

For the rolls:
1-2 Sheets of nori {the number of sheets you use will depend on how thick you want your rolls}
1/3 Cucumber; seeded and cut into matchsticks
1-2 Green onion tops; sliced lengthwise
1/2 Carrot; cut into matchsticks {or you can use a carrot slaw mix like I did to save time}
1/2-1 Cup shredded lettuce
Tuna Salad

Lay out a sheet of nori on a cutting board.  Sprinkle it with a little bit of water to make it pliant.  I just wet my finger tips and flicked the water onto the sheet so it was slightly damp but not so wet that it would tear once I started to roll.

Start by laying down some of the tuna salad.  I leave about an inch and a half of the nori sheet closest to me empty so I have room to start to roll from.  Layer your vegetable matchsticks on top followed by the lettuce.  Now you should have a mound of filling ready to be rolled up.  The amount of filling you put in will not only determine how large your rolls will be but it will affect how easy it is to roll the nori. I'm not an expert at rolling nori so I just went with the good old trial and error method for this.

Grab the end closest to you and pull it up over your fillings.  You want to tuck it over as your begin to roll and really focus on keeping it tight so your salad stays nicely secure in the nori package.  Roll all the way up to the end and make sure it adheres so your roll stays together. Repeat with remaining ingredients. 

Once all your rolls are made you can then cut them into your desired size.  You can keep them longer like the size of a spring roll or cut them more bite sized like sushi.  I suggest you use a very sharp knife that you clean off after every cut or two or it'll become harder to cut through your rolls.

Plate and enjoy!


Note: Feel free to play around with the tuna salad flavourings.  This is just a basic recipe so you can add whatever spices or ingredients you want to make it more exciting. If you're not a mayo person use a mashed up avocado instead.  Hate tuna? Chicken salad would work as well. You could also just lay down the mashed up avocado and put the remaining ingredients on top for a vegetarian friendly roll.  The sky's the limit!


G.

Monday, April 29, 2013

G Eats: Pizza Kale Chips

Kale chips are a revelation.  I'm not sure how I went so long without these tasty morsels of guilt free snacking.  With the use of my dehydrator, it's so simple for me to just toss them in before bed and wake up to delicious chips.  For the most part I have been going the simple olive oil and salt route with flavourings, but over the past few weeks have started to explore some other combinations as well. 

Last week I happened upon a recipe for pizza flavoured kale chips.  Intrigued, I started to browse through a bunch of different recipes before settling on my ingredients. After some measuring, blending, mixing and dehydrating I ended up with these beauties:


{Pizza flavouring - check. Crunchy snackable goodness - check.  Eating a whole helping of this in one sitting - double check}

Pizza Kale Chips

  • 1 Bunch of kale {washed, dried and veins removed} 
  • 1 Cup raw shelled sunflower seeds {soaked 4 hours}
  • 1 small can tomato paste
  • 2 1/2 Tbsp nutritional yeast
  • 1 tsp each: red pepper flakes, garlic powder, onion powder, basil, rosemary, oregano
  • 1/2 tsp fennel seeds
  • Salt to taste
  • 2 Tbsp Olive Oil
  • Filtered water {to thin out mixture}
Combine everything except the water in a food processor.  Blend until everything is well combined and broken down.  At this point you should have a very thick orange mixture that needs to be thinned out.  With the processor still running slowly add in the water a 1/4 cup at a time to create a smooth paste.   The amount of water you use will depend on  how thick or thin your want it to be.  You want the paste to be thick enough to really coat the kale without being too heavy.  It's all personal preference though.

Place your kale in a large bowl and pour your sauce on top.  Use your hands to mix ensuring that every leaf is covered in your delicious pizza flavours.  Don't be afraid to get your hands dirty and really massage the sauce into each piece of kale.

Lay out in a single layer on your trays and dehydrate overnight {approx. 12 hours} or until chips are completely dry and crispy.

Consume with enthusiasm. 

*Note: I have a very cheap dehydrator that doesn't have any sort of temperature control, so timing will most certainly vary depending on what kind of dehydrator you use.   


Happy snacking!

G.

Monday, April 8, 2013

Current Obsessions GGO {Going Gaga Over}

Well I'm not going to lie, it's early April and life is throwing me curveballs {and I don't mean the kind on the baseball diamond}.  Being unemployed is STRESSFUL. I am trying to maintain a regular 8:00-5:00 work schedule where I must be a productive human being.  My 'work' day generally consists of job hunting, errand running, apartment cleaning  /organizing and trying to stay relatively sane while not spending money.  Man EVERYTHING costs money. I'd like to say money doesn't matter, but when you aren't making any...it matters. So far I am relatively calm, we will see what happens in a few weeks when my last cheques run out.

Meanwhile I am trying to focus on the positives of life, which leads me to the things I am currently obsessed with.

1) My Dehydrator - Kale chips, beef jerky, dried fruit and no added preservatives/unneeded ingredients - this little beauty is a gem of a kitchen appliance.  I haven't ventured too deep into all the things I can make, but I will.  Currently I just have a very cheap model with a few trays and no temperature control.  Eventually I'd like to upgrade to one of the fancier models, but for now I'm good.  Snack away.

2) Organix Coconut Milk Shampoo & Conditioner - I am slowly trying to switch over to a more natural beauty routine.  I have really sensitive skin that reacts badly to a lot of ingredients so I have to be careful.  I'm replacing everything one product at a time so I know how I react to everything.  After a failed attempt at going shampoo free {in which I gave myself a dry itchy flaky scalp with greasy hair} I wanted a gentle, sulphate free hair care routine. Also I didn't want to break the bank. After some searching I landed on the Organix Coconut Hair Care line.  Easily available at my local drug stores, affordable and made with simple ingredients.  It's light weight and leaves my hair soft, manageable and smelling divine! Seriously this stuff smells so good that sometimes I find myself sitting around sniffing my hair. Love it!


3) Coconut Anything - While I'm on the subject of coconut, who knew how awesome and diverse it was?  Before going Paleo, coconut was on my short list of things I hated!  How could I have ever loathed such a wonderful food? Be it coconut milk or water, shredded or flaked, oil or butter - I now LOVE all things coconut. I officially retract any past statements condemning you fair coconut. I was wrong and you were right - let's be friends forever.


4) MLB TV - You didn't think I could talk about obsessions in April and leave out baseball did you?  Purchased before money became tight, this is my first season with a subscription to MLB TV. I am already stretching my Fella's patience with the amount of baseball games I am watching {3 games a day isn't too bad right?}. Now part of this is due to the fact that I am home so much now, mixed with the subscription.  He is used to only having to suffer through watching all of the Blue Jays games and an occasional extra game here and there. But now with this wonderful new world of baseball-viewing heaven opened up before me...I simply can't resist.  I will just have to soothe his anti-sports nature with more baked goods, because baseball is not going anywhere.


5) Banana 'Ice Cream' - Once again leave it to Pintrest to provide me with new and addicting dessert options.  If you have yet to freeze some bananas and puree them into a smooth delicious treat please do so immediately.  Don't be afraid to drop a spoonful of almond butter and cocoa powder into the mix either.  Your taste buds will thank you.


Happy April!


G.

{As usual any opinions on products, recipes, etc mentioned here are solely mine and are no way affiliated with any companies.  I'm not an expert, just a girl sharing the stuff I love}


Wednesday, April 3, 2013

Anniversary Grub

Last week my Boyfriend and I celebrated our 4 year anniversary.  We are not a typical super romantic couple, although we do have our moments.  When this date pops up every year, there is no gift buying or expensive restaurant reservations.  No flowers or jewellery, I'm not that kind of girl.  Usually it consists of the two of us finding a new, cheap place to eat great food and hang out.  This year, since we're trying to eat more at home, I decided that I was going to make a feast for us. When I asked my fella what a perfect meal would be for him, he simply said: bacon wrapped things?  Challenge accepted.   It was decided that every course would have bacon in it somewhere.


For the first course I decided to do a romantic twist on a caesar salad. In place of typical croutons and bacon bits, I made heart shaped pretzels topped with a delicious bacon jam. The smokey saltiness of the jam really complemented the strong garlic flavour of the salad dressing. I'm not usually a big caesar salad fan, normally I find them to be a little too plan and boring.  Not to mention that I don't eat bread and dislike creamy salad dressings.  But this dish struck the perfect starting note for the meal. 

{A little extra love never hurts a meal}
For the main course I went rustic.  Roasted cornish hens served with mashed turnip and bacon wrapped asparagus spears.  Fairly straight forward and simple, but so satisfying. A few spoonfuls of bacon jam may have found their way into the turnips as well.  How clumsy of me.


Dessert. Heart shaped chocolate cupcakes topped with chocolate ganache, shredded coconut and chocolate bacon meringues.  Paired with toasted coconut coffee for him and organic stormy night tea for me.  Definitely the perfect sweet ending to a delectable meal.


In the end we had stuffed bellies, smiles on our faces, 4 years of togetherness and leftovers for the next day.  Even though I only technically wrapped one thing in bacon, I think the ingredient was incorporated quite well throughout the meal.  Of course this means that next year I will have to top myself with a new challenge and an even better meal.  Good thing I have almost 365 days to prep.


G.

Tuesday, May 8, 2012

The Gradual Evolution Of My "Diet"

 I have become a cavegirl!!! 

 Well more specifically I have adopted the Paleo way of eating, which is to say I've gone waaaaay back to our roots. The Paleo "Diet" {I don't really like the term diet because, for me, this is more an adapted life change and not a fad or crash diet solely based on loosing weight as fast as possible.  It's more about living a healthy lifestyle.  But I digress.} is all about eating more like the cave men used to eat. Lots of veggies, lean meat, seeds, nuts and healthy fat and cutting out dairy, grains, processed foods/sugars, legumes and starches. For a more in depth description you can check out this site: http://paleodietlifestyle.com/ which will describe exactly what it is way better than I could.

So how exactly did I end up here? For me it seemed like a natural progression.  After all of my weight gain due to injury I found myself lacking energy and generally feeling like crap all the time.  In addition my blood sugar began to jump all over the place.  I've always had to be careful to make sure my sugar levels didn't drop or I would feel really sick, but it was at the point where I wasn't even hungry but they were acting like I hadn't eaten in hours.  I started to re-evaluate my diet and lifestyle and try to figure out what I could do to even out my blood sugar, lose some weight and start feeling healthy again. I started by making more health conscious choices and getting more exercise in.  A few months ago I decided to cut gluten/wheat out of my diet, and in the process I read the book Wheat Belly.  It opened my eyes to the kind of food I had been consuming and I decided to give the diet a try.  I cut out a lot of crap from my diet and went through full wheat withdrawal as I purged it from my system.  I found that I was having a hard time motivating myself and that I didn't love all of recipes in the book.  But I was starting to feel better.

I am a notorious recipe searcher, I can spend hours combing the internet/books/magazines/etc for new ideas on things to cook.  I knew the answer to my motivation problem lay in the blogosphere and started looking for sites that had recipes that were "wheat belly" friendly.  I found a lot of gluten free/celiac friendly blogs at first {they are close but not quite what I needed. They still contained components that I no longer ate}, then I began to see sites talking about the Paleo Diet.  It was really similar to the diet I was already on, but seemed a bit more cohesive.  There were some differences that made more sense and it made me excited about the food I was eating.  The more recipes I scrolled through, the more I read about what exactly this eating habit entailed and how I could adapt to the lifestyle.  I thought to myself, well you're almost there anyways mine as well give it shot.

I realize that a lot of people think I'm crazy.  There is now a long list of food I can't eat and the majority of it used to be what I consumed most. I am now one of those difficult to go for dinner with people too, most of the menu items are not on my list of 'can haves'.  In fact my first restaurant experience since my switch was last week and resulted in me being very sick for a couple days.  The initial move to this diet is not easy, you have to re-adjust what your body thinks it's craving and really dedicate yourself to it 100%.  There is A LOT of temptation, but so far the results I am starting to see are nothing but positive. I have not had a blood sugar drop in weeks, I have dropped about 10 pounds, I am finally at the point where I don't miss bread, my energy levels are up and food is soooo good! When I eat I am full but not bloated/over stuffed, just perfectly satisfied and every day I miss my old diet less and less.  I am still new at this, learning the ropes so to speak, but it's not going to stop me from making delicious meals and yummy {paleo friendly} baked goods.  For me this is a whole new way of thinking and living, and so far I'm loving it.


G.

 
P.S. Stay tuned for updates on this AND my adventures in culinary class.